

I still remember the magic of pulling my first roll of developed film out of that tank. In this step-by-step beginner’s guide to home film development, I’ll show you just how easy it is to start developing your own 35mm and 120 film at home.
If you’ve been thinking about developing your own film at home, I’m here to tell you something that might surprise you: it’s way easier than you think. You don’t need a fancy darkroom or thousands of dollars in equipment. In fact, you probably have space in your kitchen or bathroom to get started right now.
In this step-by-step beginner’s guide to home film development, I will walk you through everything I wish someone had told me when I was starting out.
Why Develop Your Own Film?
Before we dive into the how-to, let’s talk about the why. Sure, you can drop your film off at a lab, but here’s what you’re missing:
- Creative control: You decide how your images look instead of relying on the vision of the person editing your images at the lab
- Cost savings: After about 10-15 rolls, you’ll break even your gear invested. Developing film at home costs about 2-4$ per roll depending on chemistry you use and the process you do
- The magic: There’s something deeply satisfying about the entire process and pulling the film from reel
- Learning: You’ll understand photography on a whole new level
Trust me, once you’ve developed your first roll successfully, you’ll be hooked.
The Perfect Starting Point: Get Everything You Need in One Package
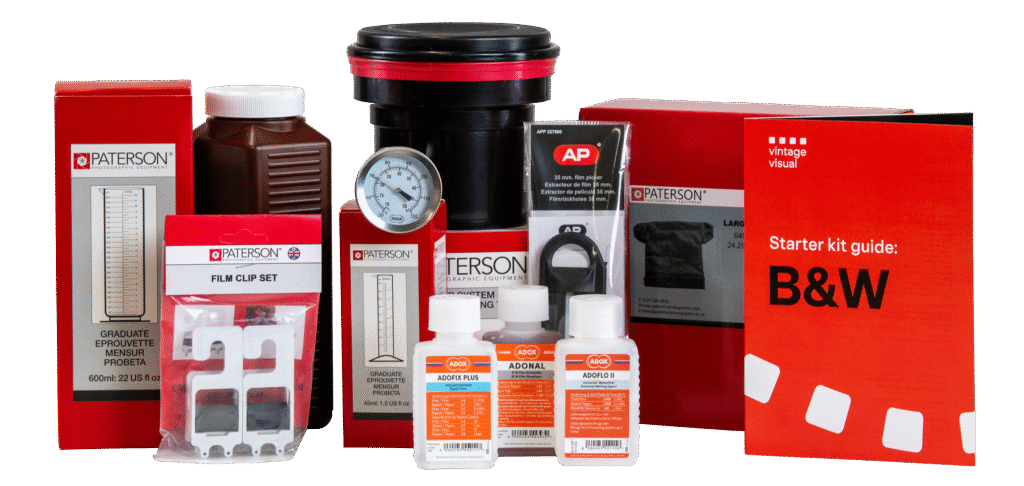
Here’s the good news—you don’t need to hunt around for individual pieces or worry about compatibility. The Black & White Starter Kit from Vintage Visual contains everything you need to develop your first roll of film successfully.
What’s included in the starter kit:
- Professional developing tank with reels (works for both 35mm and 120 film)
- Changing bag (your portable darkroom)
- Complete chemistry set (developer, stop bath, fixer, and wetting agent)
- Thermometer and measuring graduates
- Film clips for drying
- Detailed instructions
Total cost: Just €148 for everything. Compare that to €10-15 per roll at most labs, and you’ll break even after just 9-11 rolls. Plus, you’ll have consistent, reliable equipment that works together perfectly.
Why I recommend starting with a starter kit: When I was beginning, I spent weeks researching individual components, worrying about compatibility, and second-guessing my choices. A starter kit eliminates all that stress and gets you developing film immediately.
Your First Development Session: Black & White
I always recommend starting with black and white film—it’s more forgiving, and the process is straightforward. Here’s how it goes down:
Step 1: Set Up Your Space
Find a spot near a sink with good ventilation. I use my kitchen counter. Lay out all your gear like you’re prepping for surgery—you’ll want everything within reach.
Mix your chemicals to the right temperature (68°F/20°C is the sweet spot for most films). This is where that thermometer from your starter kit becomes your best friend.
Step 2: Load Your Film (The Scary Part)
This is where most beginners get nervous, and I get it. You’re handling your precious film in complete darkness.
Here’s my method: Put your tank, reels, scissors, bottle opener, and film into the changing bag. Seal yourself in. Take a deep breath—you’ve got this.
Open your film canister, trim the corners if needed (trust me, this helps), and feed it onto the reel using that ratchet action. It should feel smooth. If it’s fighting you, back up and try again.
Once loaded, put the reel in the tank and close that lid tight. Now you can come out into the light!
Practice tip: Buy a roll of expired film and practice loading it in normal light first. Your future self will thank you.
Step 3: The Chemistry Dance
Now comes the fun part—the actual developing!
Develop: Pour in your developer, start that timer, and agitate continuously for the first 30-60 seconds. After that, give it about 10 seconds of gentle agitation every minute. Don’t forget to tap the tank to knock off air bubbles—they’ll show up as spots on your film.
Stop: Use the stop bath from your kit for 30-60 seconds. This halts the development process cleanly and consistently.
Fix: This makes your images permanent. Pour in the fixer and agitate intermittently for about 3-6 minutes (your kit instructions will specify the exact time). After this step, you can actually peek at your film!
Wash: Run water through the tank for 5-10 minutes, or use the Ilford method (5 inversions, then 10, then 20 with fresh water each time).
Final rinse: One minute in distilled water with a drop of the wetting agent from your kit. This prevents water spots.
Step 4: The Big Reveal
Carefully pull your film from the reel. Use the film clips from your starter kit at the top and bottom to prevent curling. Hang it somewhere clean and dust-free—I use my bathroom after a hot shower because the humidity helps prevent dust.
Resist the urge to touch or wipe the film. Just let it hang and dry naturally.
Ready for Color? Meet Your New Best Friend
Once you’ve mastered black and white (usually after 3-4 rolls), you might be ready to tackle color film. Here’s where things get trickier—color development requires precise temperature control at 100°F/38°C, and even small variations can affect your results.
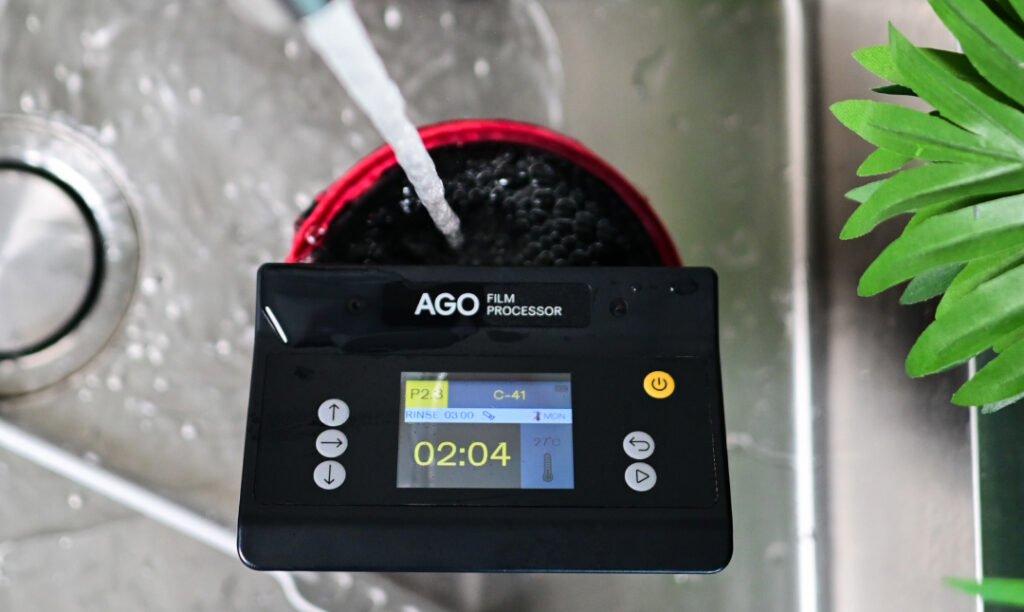
This is where the AGO Film Processor becomes something to love. Instead of juggling water baths, thermometers, and timers while trying to maintain perfect temperature, the AGO automates the entire process.
Why the AGO Film Processor is perfect for color development:
- Precise temperature control: Maintains exactly 38°C/100°F throughout the process
- Automated agitation: Consistent, gentle agitation every time
- Built-in timer: No more watching the clock and counting seconds
- Repeatable results: Every roll develops exactly the same way
- Less stress: Focus on the creative aspects instead of technical variables
Personal experience: I spent my first few color attempts nervously hovering over water baths, constantly checking temperature, and getting inconsistent results. The AGO eliminated all that stress and gave me professional-quality results from day one.
The AGO works with both black and white and color films, so even if you start with B&W in your manual tank, you’ll have a clear upgrade path when you’re ready for color or want more consistent results.
What Could Go Wrong (And How to Fix It)
Don’t worry, we’ve all been there. Here are the most common issues and what they mean:
- Blank negatives: Either your camera didn’t work, or you accidentally used fixer before developer (label those bottles!)
- Very faint images: Under-exposed or under-developed. Check your light meter and maybe increase development time slightly
- Super dense negatives: Over-exposed or over-developed. Adjust accordingly next time
- Streaky, uneven development: Usually poor agitation. Be more consistent with your agitation routine (or consider the AGO for perfect agitation)
- Round spots: Air bubbles. Tap that tank!
- Water spots: Use distilled water and wetting agent in your final rinse
- Color shifts in C-41: Temperature fluctuations. This is where the AGO’s precise control really shines
Remember: mistakes are part of learning. I ruined my fair share of rolls when starting out, and each mistake taught me something valuable.
The Economics: Is It Worth It?
Let’s do the math together:
- Starter kit: €148
- Per roll chemistry cost: ~€1 for B&W, ~€2-3 for color
- Lab development: €10-15+ per roll
You’ll break even after about 6-9 rolls with the starter kit. If you upgrade to the AGO Film Processor later, the consistent results and time savings make it worth every penny—plus you’ll get lab-quality results at home.
Safety First (Because Nobody Wants Purple Fingers)
Always wear nitrile gloves when handling chemistry. Work with good ventilation, label everything clearly, and never dump fixer down the drain (it contains silver and needs special disposal).
When in doubt, contact your local waste management about chemical disposal rules in your area.
Your Development Journey: The Perfect Path
Here’s the progression I recommend:
Step 1: Start Right
Get the Black & White Starter Kit. It has everything you need, it’s all compatible, and you’ll be developing film within hours of unboxing it.
Step 2: Master the Basics
Develop 5-10 rolls of black and white film. Get comfortable with the process, learn from mistakes, and build confidence.
Step 3: Upgrade Your Game
When you’re ready for color or want more consistent results, add the AGO Film Processor. You’ll keep using your starter kit chemistry and supplies, but with professional-level precision.
Scanning and Storage
Once you’ve developed your first successful roll, you’ll want to think about scanning. You can use a dedicated film scanner, or use a DSLR with a macro lens and a light table. Both methods work great.
Store your negatives in archival sleeves, and keep them in a cool, dry place. They’ll last decades if treated well.
Final Thoughts
Developing film at home isn’t just about saving money (though that’s nice). It’s about taking complete creative control of your images and understanding the entire photographic process from capture to final print.
Your first roll might not be perfect—mine certainly wasn’t. But I promise you, when you pull those first developed negatives out of the tank and see your images clearly for the first time, you’ll understand why so many of us are passionate about this craft.
The hardest part is getting started. The Black & White Starter Kit eliminates all the guesswork and gets you developing immediately. When you’re ready to take it to the next level, the AGO Film Processor will give you professional results every single time.
So grab that starter kit, load your first roll, and dive in. Your photography journey is about to get a whole lot more interesting.
Happy developing!
Ready to start your film development journey?
- Get the Black & White Starter Kit – Everything you need to develop your first roll
- Upgrade to the AGO Film Processor – For consistent, professional results
Have questions about developing film at home? Drop them in the comments below, and I’ll do my best to help you troubleshoot. We’ve all been beginners once, and the film community is always ready to help.