
Developing with ECN-2 Flic Film kit
Developing Motion Picture Film (ECN-2) at Home with Flic Film Chemistry
Color motion picture films such as Kodak Vision3 are processed using the ECN-2 method, which includes a special pre-bath step to remove the black anti-halation layer (Remjet). While it’s a more precise process than developing black-and-white, Flic Film’s ECN-2 kit makes it possible to achieve professional-looking results right in your kitchen or darkroom.
What You’ll Need
- Flic Film ECN-2 Kit – includes Pre-Bath, Developer, Stop Bath, Bleach, Fixer, and Stabilizer. Available in 1 L (up to 16 rolls) and 0.5 L (up to 8 rolls).
- Film developing tank – Paterson, Jobo, or similar inversion-type system.
- Accurate thermometer – essential for controlling temperatures.
- Measuring cylinders or jugs – ideally 1 L capacity for each solution.
- Distilled water – highly recommended for mixing chemistry.
- Protective gear – gloves, safety glasses, and a mask.
- Microfiber cloth – for removing Remjet after fixing.
- Film clips or hangers – for drying the film in a dust-free area.
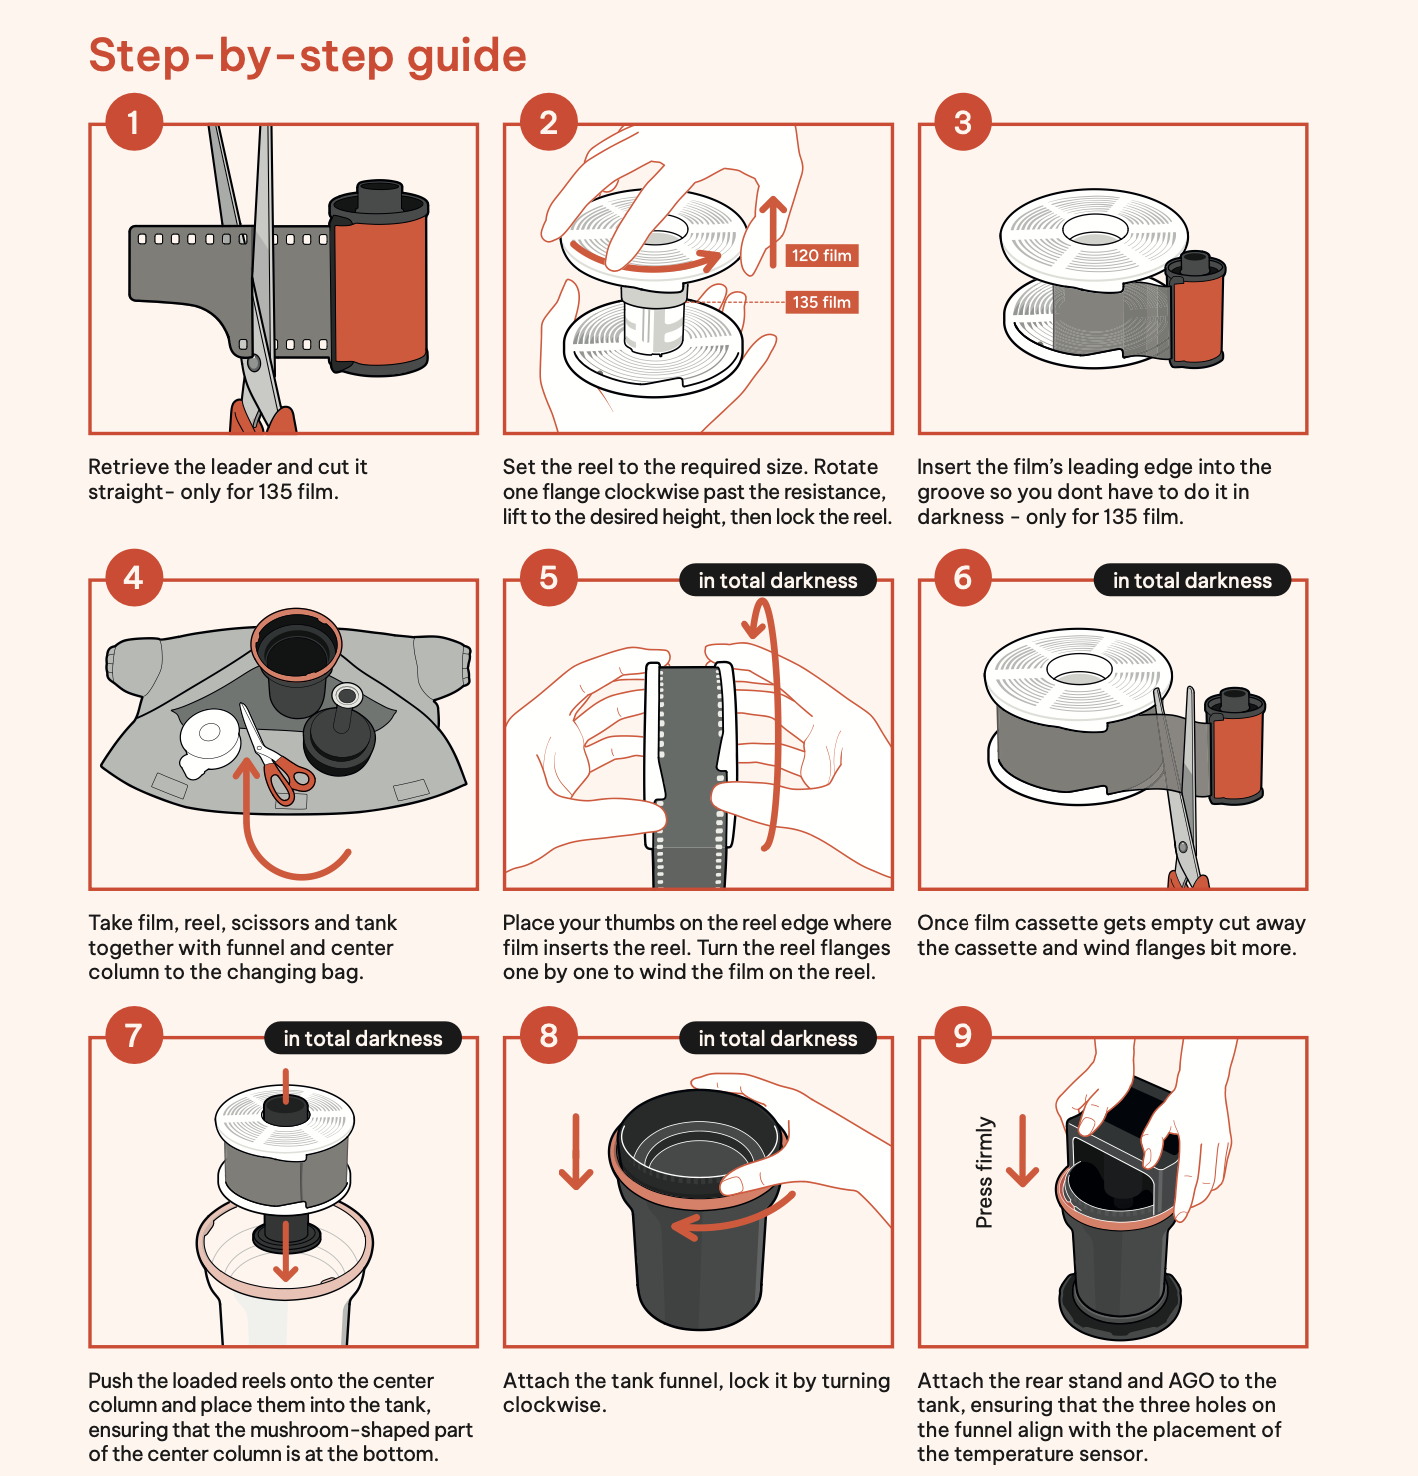
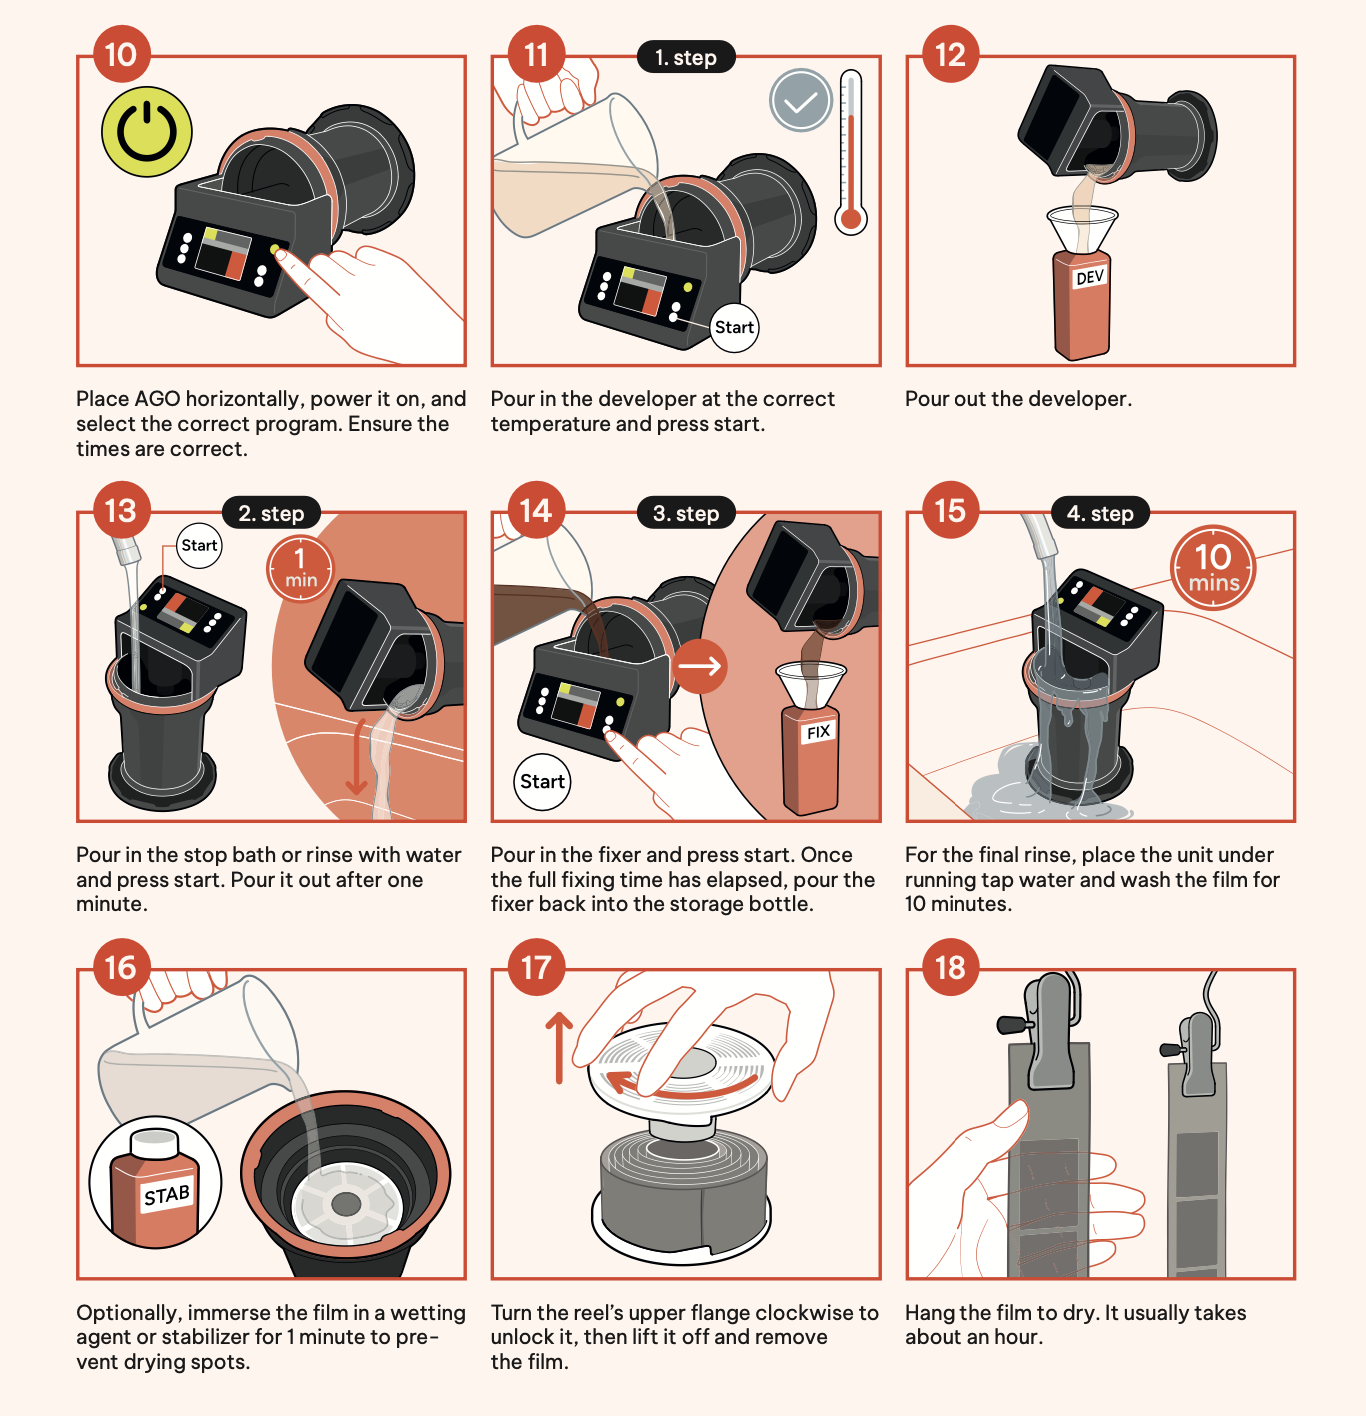
Click here to view step-by-step as images
Mixing the Chemistry
Follow the instructions for your kit size (1 L or 5 L). Always mix in a well-ventilated area and use distilled water for best stability.
Pre-Bath
- 1 L kit: Dissolve the powder in 800 ml water at around 38 °C (100 °F), stir until fully dissolved, then top up to 1 L.
- 5 L kit: Use 4000 ml water for the initial dissolve, then fill up to 5 L.
Developer
- 1 L kit: Dissolve the powder in 800 ml water heated to about 45 °C (113 °F), stir thoroughly, then top up to 1 L.
- 5 L kit: Same procedure with 4000 ml water.
Stop Bath
- 1 L kit: Mix 15 ml concentrate with 800 ml water, then top up to 1 L.
- 5 L kit: Mix 75 ml concentrate with 4000 ml water, then top up to 5 L.
Bleach
- 1 L kit: Dissolve the powder in 800 ml water at about 38 °C, then fill to 1 L.
- 5 L kit: Same method with 4000 ml water.
Fixer
- Mix to final volume using room-temperature water: 1 L for the small kit, 5 L for the large.
Stabilizer
- Dilute with room-temperature water to make 1 L working solution.
Temperature Targets
- Pre-Bath: 27 °C (80 °F)
- Developer, Stop Bath, Bleach, Fixer: 41.1 °C (106 °F)
- Stabilizer: Room temperature
Precise temperature control is critical. Use a reliable thermometer and keep your chemistry in a warm water bath if needed.
Processing Steps
Pre-Bath (Remjet Softening)
Pour in the pre-bath at 27 °C, invert continuously for 10 seconds, then let it sit with occasional gentle agitation for the full recommended time. Pour out and rinse three times with clean water, inverting vigorously each time.
Developer
Fill with developer at 41.1 °C. Agitate continuously for the first 10 seconds, then do 4 inversions every 30 seconds for a total of 3 minutes.
Stop Bath
Add stop bath at 41.1 °C, invert once, and leave for 30 seconds. Rinse three times with clean water.
Bleach
Fill with bleach at 41.1 °C. Agitate 10 seconds at the start, then 4 inversions every 30 seconds for 3 minutes. Rinse three times.
Fixer
Add fixer at 41.1 °C, invert for 10 seconds, then 4 inversions every 30 seconds for 2 minutes. Wash thoroughly for 5 minutes under running water.
Removing Remjet
After fixing, remove the film from the reel and gently wipe the base side (the dull, non-emulsion side) with a wet microfiber cloth to remove the softened Remjet backing. Rinse again to remove any residue.
Stabilizer
Immerse the film in stabilizer at room temperature for 1 minute. Avoid excessive agitation to prevent bubbles.
Drying
Hang the film in a dust-free space using film clips. Allow it to dry completely before cutting or scanning.
Reuse and Storage
- 1 L kit: good for around 16 rolls.
- 0.5 L kit: good for around 8 rolls.
- Most solutions can be reused several times; store them in airtight bottles, away from light and heat.
- Stop bath tends to last for about 8 rolls before losing effectiveness.
Tips for Best Results
- Temperature control is non-negotiable – even a 1–2 °C shift can affect color balance.
- Keep your tank inversion consistent for even development.
- When wiping Remjet, be gentle – scratches on the base layer can be visible in scans.
- For Vision3 films, ECN-2 will give you the cleanest, most accurate colors, with finer grain than cross-processing in C-41.
- Scan your negatives in a dust-free environment to make the most of your freshly developed film.
In short: Mix your chemicals carefully, keep them at the right temperature, follow the pre-bath → developer → stop → bleach → fixer → wash → Remjet removal → stabilizer → dry sequence, and you’ll get motion picture negatives ready for scanning or printing – without ever needing to send them to a lab.